
I wanted to make my kids' new playroom wall a little extra fancy. I could have rehung the wire rack we were using to store crayons and markers and such, but unfinished wood was 40% off at Hobby Lobby and YOU KNOW I LOVE A SALE! So I bought 3 of these cube shelves:

First I painted the edges with 3 or 4 coats of Americana Raw Umber to make them extra dark.
I bought a few pieces of brown polka-dot scrapbook paper so that all three pieces would have a unifying look on the outside.
On the inside I used some of the leftover paper from my fancy wall.
I stuck it all on with 3 coats of Mod Podge and used a brayer to get out all the air bubbles. I love my brayer. Supposedly you should be able to use your fingers to get the paper all smooth, and I would love to be all: "Look at me, playing in the Mod Podge with my hands. I'm all organic and one with the Mod Podge." In real life I think a brayer works much better.
When the Mod Podge was dry I wet-sanded it a little to make the finish extra smooth.
Then I hung those suckers up and placed all my Target dollar-section buckets in them. And, of course, my Kermit mug doesn't need an explanation. He's Kermit the freakin' Frog yo!
Total Cost for the 3 Storage Cubes: about $16.00

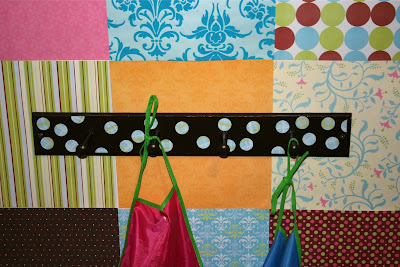
Since the unfinished wood was on sale, I also picked up this peg rack.
I painted it with 3 coats of the same Raw Umber paint that I used on my cube shelves. Then I Mod Podged on some punch-outs of leftover paper from my fancy wall. When it was done I massacred the peg rack by attaching it to the wall with 2 inch screws. I tried all sorts of frame-type hanging devices to hang it from the back, but I could never get it flat against the wall. So in the end I just pushed the screws all the way through the wood from the front and then covered the heads with paint. Total Cost: About $3.00
The last thing I did was to fancy up this much loved, hideous table:

It's a great little table, but we've had it for years and it's been used a lot. I went to the fabric store and got a little bit of that pleather-type stuff. I don't know the name of it, but it's like tablecloth material, so I didn't need to hem the edges. Because I don't sew. I measured the table before I went and got just enough to cover plus a couple inches for the sides. Of course, I waited until it was on sale, so I think it only cost me about $3.00. Then I used spray adhesive to stick it on. Even though it's still a plastic table, I like that it matches the color scheme of the wall.

So there you go, some basic coordinating wall storage and a newish-looking table for less than $25. Sweet!


