The Bandana Purse

This cute little purse and instuctions on how to make it was sent by Donna to the Chat Forum. Link can be found HERE If it appers in Italian please go to Google translate and change to english.  Many thanks again to Donna in NC

Fancy Coffee Filter Corsage

 Thanks to AmazingMoms for this idea!

Create them this unique and beautiful Fancy Coffee Filter Corsage that can last years.

All you need are:
•3 Coffee filters
•1 Pipe Cleaner
•Acrylic or Watercolor Paint
•Paint brush
•Scissors
•Ribbon
Hot Glue Gun
•Optional Embellishments: doilies, felt balls, broken jewelry, decorative paper


To create, simply follow these steps:
1.Start with 3 coffee filters.

2.Flatten them out with your hand.

3.Fold the filters like a fan. One fold towards you, one away, until you reach the end.

4.Once you have your folds all done, cinch the center with a pipe cleaner.

5.Then gently, open up each “petal” one by one.

6.The next step involves paint. Choose any color or colors of acrylic or watercolor paint, that you want the edges to be.

7.Water the paint down as much as you can, while still retaining the color.

8.Then slowly drag your brush along the edges, and watch the watery paint bleed onto the filter petals. This is my favorite part…

9.Next, cut off the ends of your pipe cleaner, so that you can hot glue a ribbon on to the back, to serve as your wrist tie.

10.The next part involves any creativity and imagination you want to incorporate into your corsage. Use papers, doilies, ribbons, felt balls, bits of broken jewelry or anything you wish, to embellish your corsage… I used wrapping paper for leaves and I hot glued doily edges here and there for extra frill. I used hot glue for this entire project. Make sure not to let children use a hot glue gun without adult supervision.
Wala ! Flower Corsage

Another coffee filter Flower

The Sock Puppy

Originaly published in 1958 he is a cute toy for an older child .Not recommend for under age 5

Lightning

Last night we had a storm. Here's what I saw from my backyard (behind the safety of my sliding glass door because THERE ARE ALL SORTS OF BUGS out there and I'm not an idiot.):


Neat, huh?

Today we were back to hot, sunny weather. Complete with Simpsons' clouds. I'm pretty sure that's the technical name for them.


I KNOW it's a cumulus cloud. Geez. I know because when I googled Simpsons' cloud just now my magical computer told me so.

A Weather Lesson, Taught by Iowa

A couple of days ago we were standing in the backyard, watching a storm come in:


Kind of amazing, isn't it?

Storms in Iowa don't mess around. The storms that we're used to seeing in California are pretty lazy in comparison. I've learned a lot about storm personalities since moving to Iowa.

California Storm: It doesn't really roll in, it's just kind of there when you wake up in the morning. It's kind of cloudy and kind of rainy. And maybe a little cold. Like 50 degrees. Because it's probably the dead of winter. It's the same 50 degrees that used to send me scurrying to get my slipper socks. And a blanket and a chip clip. To make a slanket. You got something to say?

Iowa Storm: Runs in with its arms open wide like it's the baddest mf-er in all the land. Yelling, "Waz up, Bitches!" and covers the entire blue sky with dark clouds in 2 minutes flat. Seriously. And it doesn't care if it's winter or not. Winter, summer, it's all pretty much the same amount of suffering. Stifling heat. Freezing cold. And no, I don't think 50 is freezing cold anymore. Iowa winters have cured me of that. Especially ones like this:


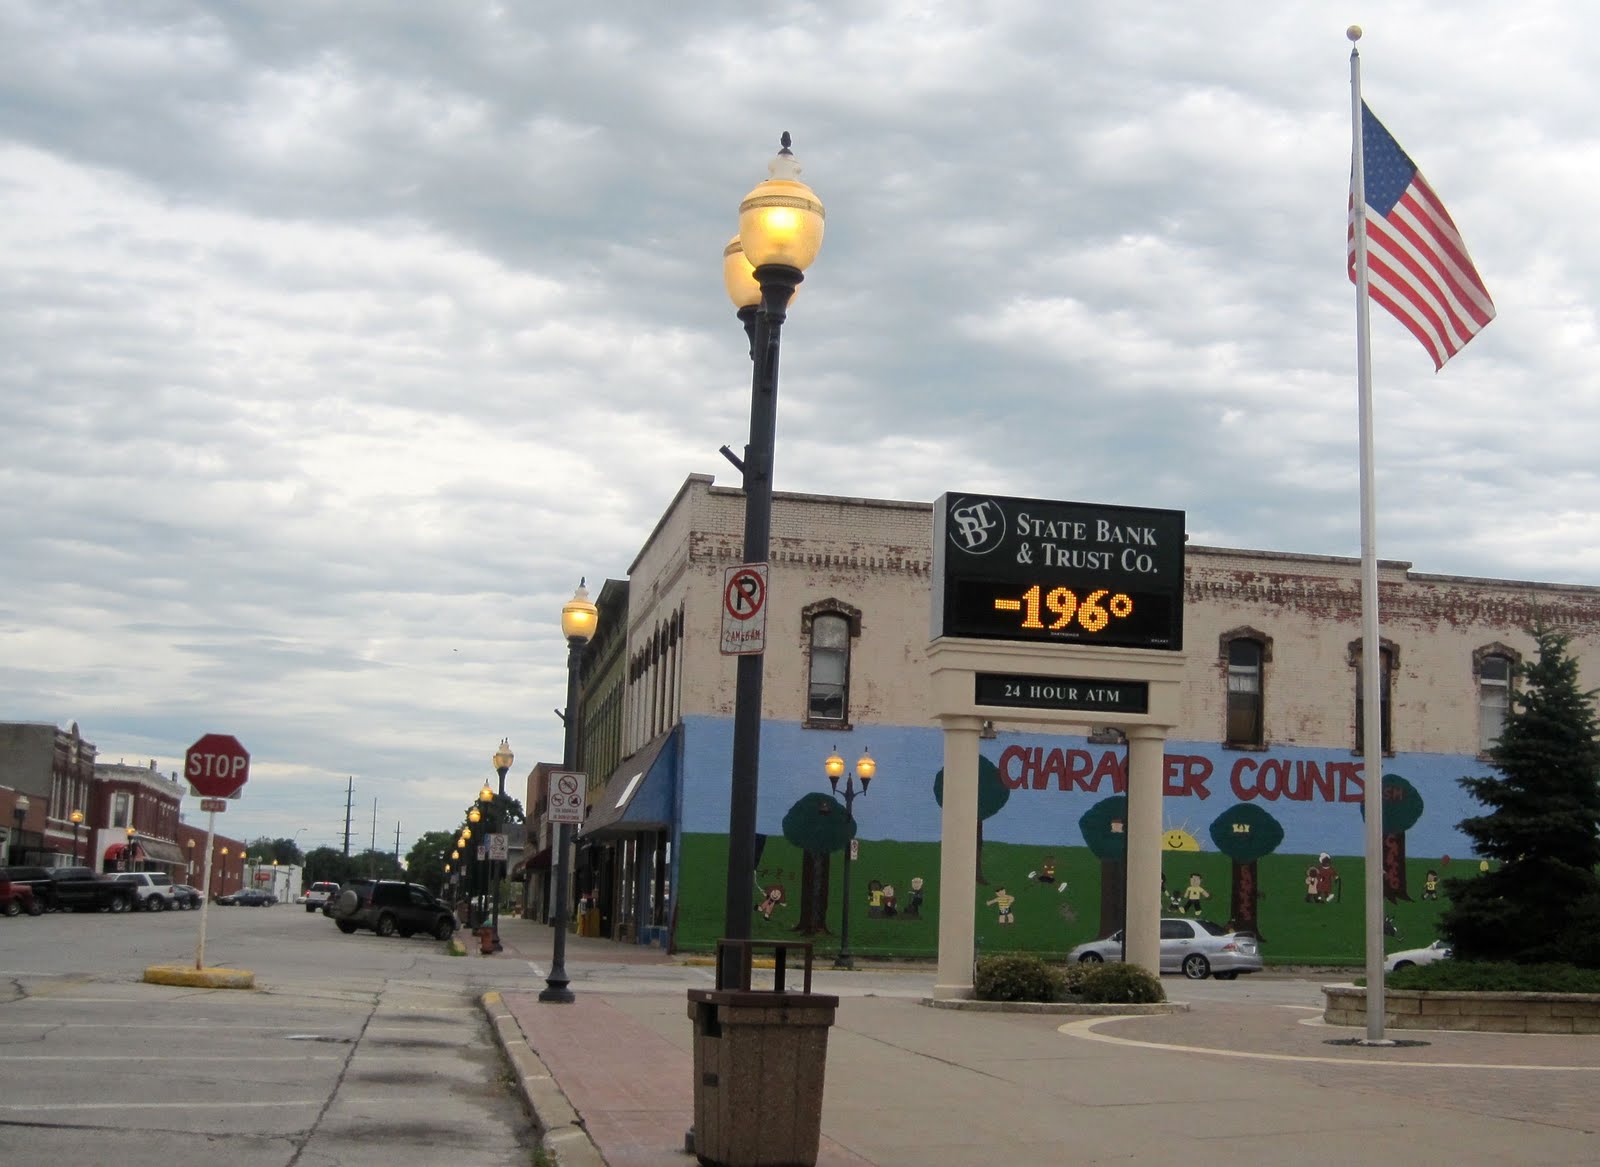
Do you see what we suffer through here? Okay, really I took that picture two days ago. When it was 80. I totally made James turn the car around when I saw that sign so that I could take a picture of it and you would feel sorry for me. But it really does feel that cold in the winter here. I mean it!

Anyway:


I love our summer storms. I love that it can be hot and raining. I love that the lightning is sometimes so continuous that it's like a strobe light. I love that the thunder can be so loud that it shakes the house like an earthquake. I love that I have a basement because of these storms. I don't love that sometimes the storms bring tornadoes and destruction, of course, but I do appreciate their strength. The rain and wind and hail and more wind. And the ability for them to change the temperature from 80 to 60 in a matter of minutes. It's all so amazing.

Peyton used to love these storms. He knows how to turn on the emergency weather radio when it beeps to warn us of a storm. He knows how to click on the online weather maps on the computer. He knows that a yellow box over an area means a thunderstorm watch and a red box means a tornado watch. Like this (taken just a few minutes ago):


Peyton used to love it. But sometime after he and James started watching Storm Chasers things changed. Now every little thing he sees in the sky worries him because it must be a tornado.

So as we're watching the storm come in, Peyton looks across the street, through the trees and houses, and asks, in a fearful voice, "Is that a tornado?" And James and I both answer, "No," before/as we turn around to see what he's looking at.


Do you see what he was looking at? Let me give you a close-up:


Technically, no matter what, we're right. Because a tornado isn't a tornado until it touches the ground. Before that, it's just a funnel cloud. See, you learn all sorts of stuff living in Iowa.

And really, it was probably just the way one cloud was angled as it covered up another cloud. Maybe? I'm not sure. We didn't hear anything about a tornado the next day. But it is interesting. Iowa weather is always interesting.

And here's what the sky looked like the next morning:


Neat, huh?

We're moving back to California in a about a week. I will miss a lot about Iowa. Summer storms are way up on that list.

Wondering Fish

While strolling through the art section in Sisters Oregon a few weeks ago we came across this marvelous item.
I have done a little work in metal but nothing as fantastic as this metal fish.
Look closely at this marvel of patience and skill.
I would love to own this beauty and display it on the table my hubby made but alas it is 2,500 dollars well worth the time and skill,but way out of my tiny art budget.
One can always dream and there are always pictures.
Enjoy the marvel of the metal fish.
.

Banana Lime Cupcakes

The tart tang of lime adds zest to that great banana flavor. Our banana lime cupcakes are a refreshing flavor combo!

Ingredients:

•2 1/4 cups all-purpose flour
•1 teaspoon baking soda
•1/4 teaspoon salt
•3/4 cup (1 1/2 sticks) butter softened
•1 1/2 cups granulated sugar
•3 eggs
•1 tablespoon lime juice
•1 teaspoon pure vanilla extract
•2 ripe bananas mashed
•1 teaspoon lime zest grated
•3/4 cup sour cream

Makes: About 18 standard cupcakes. Each cupcake serves 1.
instructions

Preheat oven to 350°F. In medium bowl, combine flour, baking soda, and salt; set aside. In large bowl, cream butter and sugar with electric mixer until light and fluffy. Add eggs, lime juice, vanilla, banana and lime zest; mix well. Add flour mixture alternately with sour cream; blend thoroughly but do not overmix. Pour into prepared pans. Bake 20-25 minutes or until toothpick inserted comes out clean. Cool 10 minutes in pan on rack; remove and cool completely before decorating.

Crazysue's Silly Corn Husk 4th of July Doll

Made By CrazySue over on the forum board this cute creation is made of corn husks.
More Photos found HERE

Father's Day Frame

Last year, I saw this on the Martha Stewart site, and I knew we needed to try it out. But I also knew I wanted to change it up a little. For example, Martha Stewart's template says Dad. Peyton and Ella still say Daddy, so I wanted their frame to reflect their perfect little kid-ness. And I wanted them to color the frame to make it extra personal. I love how it turned out.


Do you want to make one, too? It's easy!

For this project, you will need:
Card Stock
Pictures
Crayons
Scissors
Tape
6 Paperclips

You can make your own letters, or you can use these. Just drag them to your desktop and print them onto card stock in whatever size you like.

Have your kids color each letter before you cut them out. Then trim your pictures a little bit larger than the openings and tape them into place behind the frame. For this set, I cut the opening of the A a little bit bigger to fit the picture. Then I outlined it again with black marker.


Overlap the letters and glue or tape them together at the back. I backed ours with cardboard, but you really don't need to. Then, open up your paperclips. Attach the small part of each paperclip to the bottom of the back of the frame. For this one, I used glue dots and they worked out fine, but tape will work too.


Sit it up on the paperclips and you're done!


Cute as can be!

This is last year's version. Ella colored the first D and then was tired of it, so Peyton colored the rest of the letters. I did the cutting and the glue-dotting, but they helped supervise. They were so proud!


But! They are even more proud of this year's version. Because this year they kicked me out of all the major decision making.

They colored:

And they cut.
And they decided on the pictures.
And Peyton DID NOT want me to cut out the middle of the A to make it bigger like last year.
And they DID NOT want me to outline the letters with black marker.
And they wanted BLUE on the back. Because DADDY LOVES BLUE!
For goodness sake.

This year Ella did the first two Ds before she got sick of it. Luckily, Peyton loves to color, so he was more than willing to pick up the slack.


The only thing they let me do was cut out said blue.
And attach the paper clips. With TAPE! No glue dots! Geez!


But then we covered the tape with red hearts. And then they each wrote a little something on red paper to match the hearts.
And YOU KNOW they love this year's frame! Especially since I let them boss me around a little bit when we made it. What could be better?


Happy Father's Day!


FREE Doll E-Pattern

FREE Doll E-Pattern by Shashi Nayagam


Shashi Nayagam of "MoonbeamWorld.com" and "Sewing With Moonbeams" blog offers one of her wonderful dolls "Butternut" as a FREE Doll E-Pattern in .PDF format that you can download yourself.
Just CLICK on the two .pdf links below to view and print the E-Pattern and Instructions for making Butternut.

Pattern - Click here to open [Butternut-pattern.pdf]

Instructions - Click here to open [Butternut.pdf]

Shashi's Bio - “I was born in India and raised in a small hill station. When I was very young I would watch my mother's friend who made beautiful cloth dolls and dreamed of making my own dolls one some day. After growing up, getting married and moving to UK, I was able to make my dream come true. With the help of many Internet doll making friends and on line classes as well as taking classes with some of the wonderful doll artists from and in America, I have been able to develop my doll making skills. Since my childhood pastimes were drawing and painting I have been able to use these skills in creating my dolls.”
Shashi's website is "MoonbeamWorld.com" and Shashi's blog is "Sewing With Moonbeamssewingwithmoonbeams.blogspot.

Yard Updates Wisteria and Strawberry


This has become almost a weekly update.
We have moved onto the Wisteria and Strawberry Bed.
Rock now crosses the front of the deck so there will be now more mud into the house.
Hubby is working on the trenches for the French drains on this side of the yard. We had gutters put on the house and need deeper trenches on this side of the house. June 13 2010

The benches and cover for the deck will have to wait till next year.
I have almost used my whole garden budget for the year.

Made For Me By Redrooster


This was our handmade coaster Swap over on the Forum Board.
Redrooster was my partner and sent these amazing coasters made of vinyl.

Christmas in June

Well it's not Christmas but these little fairy  ornaments are so cute I thought I would share.
These were sent to me years ago.
Materials needed:


Aleene's® Platinum BondTM Glass & Bead Slick Surfaces Adhesive
Miscellaneous
Acrylic paint: pink, red and black
Bead, large round red
Brush, small
Chenille stem
Christmas ball ornament, 1” and 3”
Cup or bowl, shallow
Micro beads, silver
Needle and thread
Plastic bead, large green flower shape
Seed beads
Silk flower, large white daisy
Silk ivy, small


Instructions
For best results, please read all instructions before beginning project. Refer to photo for color and design placement.
1. Remove hangers from ornaments.
2. Paint a circle of pink acrylic paint on the small ball and let dry. Mix a small amount of red into the pink to make cheek color and add to face.
3. Add a red mouth and black eyes.
4. Pour micro beads into shallow cup.
5. Squeeze a small dot of adhesive onto large ball and dip into micro beads. As the beads adhere to the glue, press with finger to flatten and re-dip to fill in. Repeat this process one dot at a time, covering the bottom half of the ball with dots. Let dry.
6. Add a hanger with the chenille stem by making a loop and gluing across top and around neck of ornament. Glue in place and let dry.
7. Pull apart the daisy and discard any plastic parts. Use two layers of the largest daisy petals and cut a hole large enough to fit over the neck of the ornament. Glue into place. Let dry. Glue ivy leaves under petals.
8. Use the small petals from the center of the flower to make hair, turning one upside down on top of head, and then two right side up. Hold in place until glue is set. Add green flower bead and red round bead to the center of the top petals. Let dry.
9. Glue head in place and let dry.
10. String seed beads onto thread about 1-1/2” and wrap around neck and glue in place.
 
This year I think I will try the chiffon flowers to make a more delicate look.

The Little Acorn

Found this little acorn container with instructions over on
Easy to follow and great PDF download.

You, Alright? I Learned It By Watching You!

Here's the scoop: We're pretty good about not swearing in front of the kids. Disregard this post. Anyway, for the most part they believe that "stupid" and "hate" and "Oh my God" are bad words.

As in,
"Mommy! So and so naughtiest kid at school said a bad word! He said 'stupid'!"

As in,
"Mommy! Jimmy Johnson (Ella's invisible friend) pushed me! And he says ALL the bad words like 'stupid' and 'hate' and 'Oh my God.'"
"Ella, why do you hang out with Jimmy Johnson if he's so naughty?"
"Mommy, I have NO idea."

And I would like to take this moment to thank Nemo for teaching them the word, "hate." You know what I'm talking about right? You do if your kids have forced you to watch Nemo 54 gazillion times. It's when Nemo's dad tells him not to go past the drop off and so Nemo whispers, "I hate you," right before he does it anyway. For a while Ella was saying it all the time. Lunchtime: "I hate strawberry jelly!" Naptime: "I hate my room!" Bathtime: "I hate shampoo!" Super awesome. Thank you Pixar. And Disney. I can always count on you.

Anyway, I'm taking down the paper wall in the basement because we're moving. Good bye, paper wall, I will miss you!


Peyton is hanging out with me, building with his Lincoln Logs.

"Mommy, how many days until we move back to Caniforna?" (Both of my kids say California exactly like that. It's adorable.)

"About twenty. Are you excited?"

"Yeah!"

"And you and Ella will probably share a room for a while. That will be cool."

"Yeah! SUCKAS!"

Suckas? As in Mr. T? Long pause. Because I already know the answer to:

"Hey Peyton, where did you learn that word?"

Huge smile. "You!"

Yep.

I'm so proud.

Elasticity

My Dr says you lose your elasticity as you get older .
I was always a size 44DD, 26, 36 now that I should be losing my so called elasticity ,why is it my boobs have dropped 10 inches towards my ankles and my middle and butt have spread to a size 22 ??.

Dear Iowa, David Bowie called...

And he wants his magical snow creature back.


What the hell, Iowa. Sometimes you are just strange.

But, I have to say, I'll take seeing this wanna-be moth on my back door to this monstrosity any time. *shiver*


Yard Deck Update


Well it took a bit between the rain and storms but the first stage of the deck has been done.

Embellish those keys

Well in my long list of things to do with keys.
Santa magic keys,
Keys  as lamp shades,
 even key frames ,
This looks the the best way to use up those extra bags of keys.
Found and posted this some time ago on the forum but for those who missed it.
Here is the link to how to embellish keys
Found HERE

Bottle cap Jewelry

While surfing the other day I found this cute tutorial on bottlecap jewelry.
She did a great job on the tutorial.
I have a few caps to try out this one .
Found HERE
How to flatten bottlecaps

Donna's new garden creation

A wonderfully creative use of an old lamp and glass pieces to make a garden lady.
I am told it will have a face and a bow then we can see the finished product.
Great job Donna

Gift Tag Download

Good morning friends.
Today the weather is storming and the deck has been built.
We will wait until the rains pass to get it sealed and waterproof and then next year build a cover.
But today I have a gift tag to share.
Then yard photos and some more crafts found over on the forum. Enjoy