Showing posts with label House. Show all posts

Picture Perfect Switchplate

You know how kids LOVE to see pictures of themselves? I have to give my husband credit for this one. He came up with the idea to decorate Peyton's switchplate with a picture of Peyton "surfing." Peyton loved it! Originally James glued on the picture, but after a while it started to get ripped up and sad-looking, so I Mod-Podged on a new picture for better staying power.


I just think it looks so cool! Want to make one, too?

What you will need:
Wax Paper
Switchplate
Picture
Scissors
Mod Podge
Foam Sponge Brush
X-Acto Knife


Cover your work area with wax paper.

Figure out how you want your picture lined up on the switchplate. You probably want to make sure you aren't cutting out the middle of your kid's face to make the light switch hole. I'm just assuming.

Cut the picture to size, adding about half an inch to each side:


Use the foam sponge brush to Mod Podge your picture onto the switchplate, wrapping the sides of the picture around to the back. Make sure to smooth out any bubbles. I used my X-Acto knife to cut a small diagonal slice in each corner to make it easier to wrap the picture around the switchplate:


Oh wait, that's not it! Someone stole my camera to take a picture of her 3-year-old hand. Here you go:


Ella took that last picture, too. I know. She's awesome.

Turn your switchplate onto its face and use the X-Acto knife to cut an X where the light switch will be. Then turn the plate back over, fold in the cut pieces, and Mod Podge them into place.

Let your switch plate dry completely. Cover with another layer or two of Mod Podge and let dry. I colored the screws with Sharpie markers to make them match a little better:


Happy Crafting!


Dumpster Diving for Wimps

I'm all about the coupons and the sales and the free, but I draw the line at looking through dumpsters. That is, I drew the line until yesterday. I didn't really step over the line, I just kind of nudged it with my foot a little. So I could get some stuff.
Because. Stuff. Is. Awesome.

Since I did it once, I'm obviously an expert, so here is my tutorial on Dumpster Diving for Wimps (like me):

1. Have neighbors who are wealthy enough that they only occupy the house on your street for a few months a year. The rest of time they live somewhere where it is probably not freezing freaking cold don't go outside or you'll lose a limb / burning hell hot with extra humidity for added sparkle.

2. Make sure this family sells their home AND make sure they are too lazy to take their usable stuff to Salvation Army; so they stick it all in the rented Waste Management dumpster in their driveway. (Seriously, there wasn't even any actual trash in that thing, it was all stuff!) I look at it as "freecycle.org coming to a neighborhood near you!"

You can probably see where I'm going with this:
3. Make sure your husband is sweet enough to go over and score you some free stuff.

Like an Army Helicopter Game that was STILL IN IT'S BOX:


And if you've always wanted your kids to have a Little Tikes Water Table, make sure to get one of those:


Especially if your kids think "water tornadoes" are the coolest thing ever:


And a cool backyard chair that can be painted and beautified later:


4. If your old swing set was knocked down and broken by some crazy strong backyard wind, make sure that the other neighbor (who also looked through the dumpster and who knew the family and I swear my neighborhood is not as trashy as it sounds) offers to call and ask if we could have their swing set! Hell, yeah!


It could use a fresh coat of paint, and the slide is teeny tiny, but Peyton and Ella love it! And we all know that swinging is Ella's favorite thing in the world. So she's as happy as can be because this sucker has all sorts of swinging possibilities.

Ella said, "We don't have to go to all the other parks because now we have our own!"


I have to say, though, that one of the highlights was telling James, "Seriously, we have enough bouncy balls in this house! We really, really don't need any more!" as he chucked this ball across the street into our front yard. And then hearing Peyton say, "Ella, look at this Bob the Builder ball! Daddy found it in the TRASH!" Awesome. Because in two weeks, when he starts kindergarten, and his new teacher asks what he did over the summer: "We got new toys out of our neighbors' garbage!" is not exactly how I'd like my family introduced.


"O at Home" Can Suck It


I LOVE Oprah.

If there was a stronger word for love, I would totally use it in that last sentence. I adore her. I read whatever books she tells me to read. I listen very, very carefully to whatever exercise and food regimens her doctors tell me to follow - and then I don't follow them, but still, I listen carefully. Love. Love. Love. Love teetering on worship. As in, if she told me to drink the Kool-Aid, it would take me AT LEAST 30 seconds before I told her to suck it. (I just reread that sentence, and it stung a little.) And most of those 30 seconds would be spent gazing into her Oprah eyes in Oprah awe and soaking in the Oprah love.

And the only reason I can write this post in good conscience is that I'm pretty sure Oprah herself had nothing to do with my issue.

And here it is:

Plink is the name of the color of my daughter's room.

A few months ago, "O at Home" magazine made a list of "10 Shade Names We'd Never Allow on Our Walls." Yeah, I'm a little behind on my magazine reading.

Now, how many paint color names do you think there are in the world? I'm going to venture a guess that there are no less than ONE GAZILLION. Out of all those, can you guess, JUST GUESS! what "O at Home" picked as number 10 on their stupid little list? OH, NO YOU DIDN'T "O at Home!"


And, you know what, I don't really care what paint colors they'd allow on their million dollar walls. But I want the rest of the world to know, Plink is a darling color. And out of all the colors in the paint section of Lowe's, Ella chose Plink for her room. Of course, she might not have the most discernible eye for color, she is only three years old. But I fully support her and her decision.

At the bottom of their list they have a little: *Manufacturers to remain nameless.

Valspar makes Plink. I support them, too. I think the name is sweet. It reminds me of the sound a penny makes when you throw it in a wishing well. It's hopeful and small and sweet. How can you argue that kind of logic?

You might be thinking, "That Darcy - she's a whackamo. She's just making this crap up."

And if you are, first of all, who makes up crap like this? It's ridiculous.


For more proof, see this post to see Ella's cute little face when the Easter Bunny brought her the paint that she had picked out.

And secondly,
BAM!


I know, right? It's DELIGHTFUL!

And that is why I am speaking out against "O at Home" and their stupid-ass list.

And that is why, on behalf of my daughter, I am telling "O at Home" that they CAN SUCK IT. And when I get their magazine in the mail, I am totally going to read my "Better Homes and Gardens" AND the regular "Oprah" magazines BEFORE I read "O at Home" as a vow of solidarity to my baby girl. I may even make little Plink-colored awareness wristbands and send them out at Christmas. Who's ready to join us? Power to the Plink!

My sweet little Ella. Mommy's got your back, baby girl!


*Epilogue: When I went to attach a link to "O a Home" - because you know I still love it - I realized they had stopped publication! I thought I hadn't seen any new issues because I was so far behind on my magazine reading. It just goes to show what happens when magazines make crappy lists about beautiful paint colors - cancellation, baby, cancellation. Take note home magazines! Or I'll come after you, too! Power to the Plink!

Fancying Up the Playroom


I wanted to make my kids' new playroom wall a little extra fancy. I could have rehung the wire rack we were using to store crayons and markers and such, but unfinished wood was 40% off at Hobby Lobby and YOU KNOW I LOVE A SALE! So I bought 3 of these cube shelves:


First I painted the edges with 3 or 4 coats of Americana Raw Umber to make them extra dark.
I bought a few pieces of brown polka-dot scrapbook paper so that all three pieces would have a unifying look on the outside.
On the inside I used some of the leftover paper from my fancy wall.
I stuck it all on with 3 coats of Mod Podge and used a brayer to get out all the air bubbles. I love my brayer. Supposedly you should be able to use your fingers to get the paper all smooth, and I would love to be all: "Look at me, playing in the Mod Podge with my hands. I'm all organic and one with the Mod Podge." In real life I think a brayer works much better.
When the Mod Podge was dry I wet-sanded it a little to make the finish extra smooth.
Then I hung those suckers up and placed all my Target dollar-section buckets in them. And, of course, my Kermit mug doesn't need an explanation. He's Kermit the freakin' Frog yo!
Total Cost for the 3 Storage Cubes: about $16.00


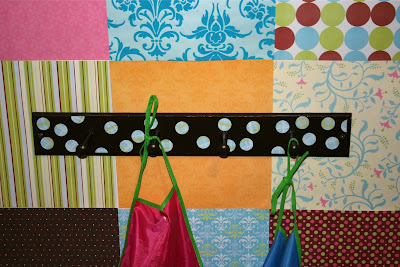
Since the unfinished wood was on sale, I also picked up this peg rack.
I painted it with 3 coats of the same Raw Umber paint that I used on my cube shelves. Then I Mod Podged on some punch-outs of leftover paper from my fancy wall. When it was done I massacred the peg rack by attaching it to the wall with 2 inch screws. I tried all sorts of frame-type hanging devices to hang it from the back, but I could never get it flat against the wall. So in the end I just pushed the screws all the way through the wood from the front and then covered the heads with paint. Total Cost: About $3.00


The last thing I did was to fancy up this much loved, hideous table:


It's a great little table, but we've had it for years and it's been used a lot. I went to the fabric store and got a little bit of that pleather-type stuff. I don't know the name of it, but it's like tablecloth material, so I didn't need to hem the edges. Because I don't sew. I measured the table before I went and got just enough to cover plus a couple inches for the sides. Of course, I waited until it was on sale, so I think it only cost me about $3.00. Then I used spray adhesive to stick it on. Even though it's still a plastic table, I like that it matches the color scheme of the wall.


So there you go, some basic coordinating wall storage and a newish-looking table for less than $25. Sweet!


My $13 Paper-Covered Wall

I spent $13 to make this paper-covered wall. No joke! It's amazing what a pad of scrapbook paper and some glue dots can do.


Our basement is mostly unfinished, meaning it has cement floors and exposed brick walls. The one basement room that is finished is one big rectangular area. We use it as a craft room / workout room / kids' playroom. Until I win my dream $10,000 Pottery Barn Kids Makeover, I'm doing what I can as inexpensively as I can to make it pretty.

I bought a stack of the premium type 12 x 12 scrapbook paper. I chose the Vibrant Treated Paper Pad because it's super colorful - perfect for my kids' play area. And you can't tell from the pictures, but some of the sheets are embossed and some have some sparkly elements.

I refuse to buy anything full price at Hobby Lobby since they usually have 40% off coupons and tons of weekly specials. It's a matter of principal/obsession for me at this point. Anyway, 90 page stack of paper - $19.00 on sale for $10.00. Glue dots - $4.49 on sale for $2.25.

Disclaimer: I know for sure that those glue dots are going to be a complete pain to take off the wall later. I'm choosing to live recklessly in the now.

So I figured out how many sheets I needed up and across to cover the wall. Since the paper is 12 x 12, it was pretty easy to figure out. When I was doing the math, I noticed that I did have a few vertical inches left, so I left 2 inches at the top and bottom of the wall bare. I could have cut some of the paper to make it fit, but I really wanted perfect 12 inch squares, so I just left a little bit of the wall blank. I would suggest that if you do a wall like this you do an entire row across and an entire row down before you do anything else. Just to make sure they fit the way you want. After that you can go for it!


Here's what the playroom looked like before:


3 hours and 2 margaritas later it looked like this:


Well, it kind of looked like that. There might possibly have been some rehanging and staging and picking up of a zillion toys before this picture. And maybe it's because it was dang cheap to make, but that wall just makes me happy.

How to Buy Yourself 2 Hours of Free Time

When we first moved into this house, we were thrilled that the previous owners had decided to leave a backyard playset behind. It had a slide and a couple of swings and it was a little worn, but our kids loved it. Unfortunately, our backyard backs up to a large field and we get these super strong winds that rush through during the spring. Despite the 11-inch spikes that anchored the playset into the ground, within 5 months of moving in, it toppled twice. The second time we found it 20 feet from it's original location and it was pretty much destroyed. You would think we lived in tornado alley or someth... wait, never mind. Anyway, we threw the wood pieces away, but kept the plastic slide and swing pieces just in case we wanted to be great parents and make the kids another playset. Those stupid pieces have been in our garage for 8 months.

And here's the part when my husband James really impressed me. He secretly brought the slide in and positioned it at the bottom of our basement stairs. He put a bunch of pillows at the end of the slide since there is wall about 3 feet from the stairs. If he didn't put the pillows there, the kids would probably be smacking their heads into the wall each time they slid down. Peyton might have enjoyed crashing the first couple times, but I bet it would've gotten old pretty fast. Also, I would have had to do some actual parenting to make sure they stayed safe. This way, Peyton and Ella can be all crazy if they want and they are protected by a mountain of cushion. And I get to watch soap operas and eat Bon-Bons. Okay, I don't really, but I totally could!

The first time they saw it, they played on that slide for 2 hours, and I'm not making that up. It's 5 degrees outside, and my kids are out of breath and sweaty playing on a slide. Ever since then, every time I ask them if they want to go play on the slide, they screech, "Yeah!" And then I'm rewarded with at least half an hour of free time.

James just got some major bonus points. Which is good, since I start his bonus points at zero at the beginning of each new year. Just kidding - I love you honey!


Did you notice that my kids decided not to wear matching socks today? If you did, you also get bonus points. Your friends and family should be proud.