Supplies Needed:
Black Construction paper: each page makes two invitations.
Red Construction paper: each page will make wings for 6 invitations.
Hole Punch: used to make spots
Wiggle eyes:(optional) need two per invitation.
Glue
Scissors
Coffee Cup
Pencil
Step 1: Ladybug Invitation:
Fold the sheet of black construction paper in half.
Using the coffee cup draw two circles on the page making sure to have the cup lay over the edge of the fold a little. The fold is on the left side.
Trace the coffee cup onto the paper creating a circle. You can get two invitations from each sheet of paper. Cut out both invitations making sure you leave the fold intact.
Use the scraps of black paper and make small circles about the size of a quarter, these will be the ladybugs' head.
Take the smaller scraps and punch holes with the hole punch.
Step 2: Ladybug Invitation:
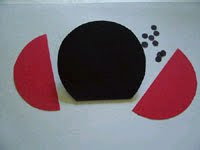
Using the same coffee cup draw complete circles on the red paper. You can make six circles from each piece of paper. Cut out all the circles. Cut each circle in half creating a set of wings for each ladybug.
You should now have all the parts shown in the picture below.
Step 3: Ladybug Invitation:
With the fold towards the top, add one of the wings to the black body section. Make sure you slant it outwards leaving the gap in the center. Once you have one wing placed glue the other wing into place. It will overlap the first wing a little at the top.
Glue the dots on the wings. When putting dots on you want to use odd numbers (3,5,7). An even number of dots will look funny!
Glue the head (small quarter sized circle)onto the wings where they overlap.
Glue the two wiggle eyes onto the head.
The finished Ladybug Invitation:
This is what the invitation will look like when you finished it.
The ladybug will open from the rounded side.
It really doesn't take very long to make party invitations and can be loads of fun.
Print out your party information on a mailing label or a name tag label.
Just peel and stick to the inside.
happy mothers day : top 5 mothers day poetry in 2012
-
happy mothers day : top 5 mothers day poetry in 2012 happy mothers day :
top 5 mothers day poetry in 2012 happy mothers day : top 5 mothers day
poetry i...


