Because Nipples Are Circles, Obviously

Peyton, Ella, and I read together every night.

Dream World:
I tell my sweet, well-behaved children to go pick out a story. They each choose an age appropriate book and calmly bring them over to me.
Peyton says, "You can read Ella's first, if she wants."
And then Ella says, "Oh, that's all right, older brother, we can read yours first. We read mine first last night, and we should be fair."


Reality Check:
I tell my whackamo kids to go pick out a story. It's like the Running of the Bulls down the hallway. They choose their books as fast as humanly possible and race back to me. There's a lot of screeching and shoving of books at me. "Mine first!" "NOOOO! I got here first!" "No! Mommmmy! I go first!" "MOMMMMMMMY!"

Dream World:
We cuddle and read and discuss character traits and plot twists.


Reality Check:
We're in the middle of reading a "Cars" book.
Ella declares, "Peyton! You have nipples and me have boobies!"

I tell her that they both have nipples. I don't even bother with the boobies part. Because, really, is this going to be some kind of great teachable moment? It's doubtful.

Ella points out a circle in the book and yells, "Nipple!"
Peyton finds a circle and yells, "Boobie!"

And then my kids must have smoked some kid-crack when I wasn't looking because they start to have that wacky kid high. You know the one - when kids are so struck with the sillies they are almost hysterical with the laughter and the squealing.

I try to keep reading but it's a "Cars" book so there are a lot of car tires. Which means there are a lot of circles. Which means that Ella and Peyton begin a frenzied rush to point out all the circles as they shriek "Nipple! Boobie! Nipple! Boobie! NIPPLE! NIPPLE! BOOBIE!"


And then it turns into a song, "Nipple! Nipple! NIPPA NIPPA NIIIIIIIPLE!"
So, ummm, yeah, I'm pretty sure I didn't miss out on that teachable moment opportunity.
Wait a second! They totally practiced identifying circles.
Sha-Bam! Even though I didn't help or encourage them. And even though they are 3 and 5 years old and have known for quite some time how to identify a circle. It totally counts. I am the BEST PARENT EVER.

Dream World:
Story time is over. My children get into their beds and THEY STAY THERE. And then I go into each room and we talk about the best parts and worst parts of our day and we give hugs and kisses and we say goodnight. And my children continue to STAY in their respective bedrooms. And there is peace and quiet in the house.

Reality Check:
"Okay, great! You are both very strange. It's why I like you. Go get in your beds."
They get into their beds and from the living room it sounds like they're playing Marco Polo:
Kid One: "NIPPLE!"
Kid Two: "BOOBIE!"
Kid One: "Oh look! There's a BOOBIE!"
Kid Two: "BOOBIE! NIPPLE! BOOBIE!"
And then one kid or the other appears randomly in the hallway to yell "NIPPLE! BOOBIE!" in my general direction before racing back to bed.

Dream World:
You are totally jealous of my perfectly-executed bedtime reading routine.

Reality Check:
I pour myself a much-deserved glass of red wine. Or three. While I watch "Weeds." Because Nancy is a terrible parent and she deals drugs. I judge my parenting skills by comparison. And that means I AM AWESOME.


Because IT IS NOT A Dry Heat.

Yesterday it was really, really hot. Do you know what the heat index is? Because when I lived in California, I didn't know. The heat index is used when it's really freakin' hot and really freakin' humid and they need a whole separate scale to tell you that if you go outside you will probably spontaneously combust. It's like this: Yesterday it was 94 degrees, but with the humidity it felt like 200,000 (really 109) degrees.

At one point I went into the garage to put a trash bag into the big garbage can. The garage is attached to our house. The big garbage can is about 15 feet away from the house door. About halfway there I came to the conclusion that I wouldn't be able to make it back. It was just too hot and I didn't bring any water. And then I started thinking about what Bear Grylls would do. And then I started thinking about how good looking he is. And then I started thinking about how he would probably put a urine-soaked shirt on his head. And since I wasn't going to do that, my tombstone would read:
She Should Have Taken Water With Her On That Reckless Trek To The Garbage Can.

Amazingly, I did make it back into the house. I know! I count myself lucky. I should totally be on one of those survivor shows. "Woman puts trash bag in garbage during Iowa heat wave. And LIVES to tell about it!" And I could totally reenact it for the dramatization portion. It would be AWESOME! And then I would go on speaking engagements and then somehow I would get to meet Oprah.

Anyway! Whatever! I'm trying to live a dream here, people! A couple hours later the sky looked like this:


And then about a half hour later it looked like this:


And then James and I were standing in our backyard and we watched as the clouds started to swirl above our heads. Do you see the swirl in the middle of the pictures?


We actually saw three of those large swirls above us. I was halfway convinced that three tornadoes were about to land on us. James was excited because he got to say, "WE HAVE ROTATION! WE HAVE ROTATION!" about one hundred times as he videotaped it. And I was excited because I got to make fun of him. And then the wind was rushing around us in every direction and I don't like it when my hair blows around so I went inside.

And then the sky looked like this:


And then it started to rain. The important part of this story being that when it started to rain and the sky turned black with clouds the temperature dropped to 75 degrees and I was happy.
The End.

Progression of Joke Telling

Peyton made up a new joke the other day. And it got me thinking about how my little boy's humor has changed as he's grown.
Remember the "Diarrhea" song in "Parenthood" as the family is driving home?
"As you're sliding into first and you feel a little burst - Diarrhea! Diarrhea!" and the kids are absolutely cracking up as they sing it. Remember that? Yep. My son is at that age.

Here was his best joke when he was 3 years old:
He would stop whatever he was doing, walk over to me and yell-whisper, "PEANUT BUTTER!"
And then he would crack up. So innocent and sweet.

Then he turned 4 years old and started to get the basic idea of what a joke really was:
Peyton: "What's a tree and an elephant like?"
Me: "What?"
Peyton: "A TRUNK!"
And then he would crack up. Sure, he was telling the joke the wrong way, but he understood the basic principle.

And since he understood the basic principle of joke telling, he was able to put his own spin on it:
Peyton: "Mommy, what's an iPhone?"
Me: "I don't know, what is it?"
Peyton: "A phone with POOP on it!"
And then he would crack up. Here is when I realized that EVERYTHING is funny with poop on it.


And this is the new joke he told the other day, he's 5 years old:
Peyton: "Daddy, can you marry a pig?"
James: "No."
Peyton: "Because they don't have VAGINAS!"
Oh My Dear Lord, you have never heard a kid laugh so hard. And I know that this joke is just weird on so many levels, so I try not to think about it. But this is when I realized that EVERYTHING is funny with private parts attached.


Awesome. What could possibly come next in the land of boy jokes?

Fancying Up the Playroom


I wanted to make my kids' new playroom wall a little extra fancy. I could have rehung the wire rack we were using to store crayons and markers and such, but unfinished wood was 40% off at Hobby Lobby and YOU KNOW I LOVE A SALE! So I bought 3 of these cube shelves:


First I painted the edges with 3 or 4 coats of Americana Raw Umber to make them extra dark.
I bought a few pieces of brown polka-dot scrapbook paper so that all three pieces would have a unifying look on the outside.
On the inside I used some of the leftover paper from my fancy wall.
I stuck it all on with 3 coats of Mod Podge and used a brayer to get out all the air bubbles. I love my brayer. Supposedly you should be able to use your fingers to get the paper all smooth, and I would love to be all: "Look at me, playing in the Mod Podge with my hands. I'm all organic and one with the Mod Podge." In real life I think a brayer works much better.
When the Mod Podge was dry I wet-sanded it a little to make the finish extra smooth.
Then I hung those suckers up and placed all my Target dollar-section buckets in them. And, of course, my Kermit mug doesn't need an explanation. He's Kermit the freakin' Frog yo!
Total Cost for the 3 Storage Cubes: about $16.00


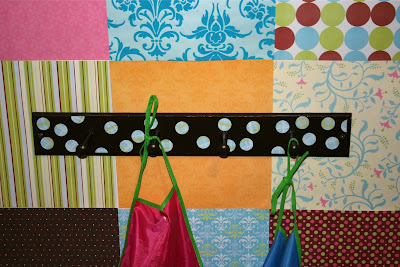
Since the unfinished wood was on sale, I also picked up this peg rack.
I painted it with 3 coats of the same Raw Umber paint that I used on my cube shelves. Then I Mod Podged on some punch-outs of leftover paper from my fancy wall. When it was done I massacred the peg rack by attaching it to the wall with 2 inch screws. I tried all sorts of frame-type hanging devices to hang it from the back, but I could never get it flat against the wall. So in the end I just pushed the screws all the way through the wood from the front and then covered the heads with paint. Total Cost: About $3.00


The last thing I did was to fancy up this much loved, hideous table:


It's a great little table, but we've had it for years and it's been used a lot. I went to the fabric store and got a little bit of that pleather-type stuff. I don't know the name of it, but it's like tablecloth material, so I didn't need to hem the edges. Because I don't sew. I measured the table before I went and got just enough to cover plus a couple inches for the sides. Of course, I waited until it was on sale, so I think it only cost me about $3.00. Then I used spray adhesive to stick it on. Even though it's still a plastic table, I like that it matches the color scheme of the wall.


So there you go, some basic coordinating wall storage and a newish-looking table for less than $25. Sweet!


My $13 Paper-Covered Wall

I spent $13 to make this paper-covered wall. No joke! It's amazing what a pad of scrapbook paper and some glue dots can do.


Our basement is mostly unfinished, meaning it has cement floors and exposed brick walls. The one basement room that is finished is one big rectangular area. We use it as a craft room / workout room / kids' playroom. Until I win my dream $10,000 Pottery Barn Kids Makeover, I'm doing what I can as inexpensively as I can to make it pretty.

I bought a stack of the premium type 12 x 12 scrapbook paper. I chose the Vibrant Treated Paper Pad because it's super colorful - perfect for my kids' play area. And you can't tell from the pictures, but some of the sheets are embossed and some have some sparkly elements.

I refuse to buy anything full price at Hobby Lobby since they usually have 40% off coupons and tons of weekly specials. It's a matter of principal/obsession for me at this point. Anyway, 90 page stack of paper - $19.00 on sale for $10.00. Glue dots - $4.49 on sale for $2.25.

Disclaimer: I know for sure that those glue dots are going to be a complete pain to take off the wall later. I'm choosing to live recklessly in the now.

So I figured out how many sheets I needed up and across to cover the wall. Since the paper is 12 x 12, it was pretty easy to figure out. When I was doing the math, I noticed that I did have a few vertical inches left, so I left 2 inches at the top and bottom of the wall bare. I could have cut some of the paper to make it fit, but I really wanted perfect 12 inch squares, so I just left a little bit of the wall blank. I would suggest that if you do a wall like this you do an entire row across and an entire row down before you do anything else. Just to make sure they fit the way you want. After that you can go for it!


Here's what the playroom looked like before:


3 hours and 2 margaritas later it looked like this:


Well, it kind of looked like that. There might possibly have been some rehanging and staging and picking up of a zillion toys before this picture. And maybe it's because it was dang cheap to make, but that wall just makes me happy.

My Paper-Covered File Cabinet

A while ago I walked into Jo-Ann Fabric Store to get some craft supplies. For the record, I go to Hobby Lobby and Jo-Ann's at least once or twice a week. Because I have coupons and I need stuff, people! Since I make Craft Kits for Kids, (SHA-BAM! Did you see that sweet plug?) I need a lot of craft supplies like pom-poms and wiggly eyes and chenille stems and blah, blah, blah ... you get the idea.

Since my basement craft area has a budget of about zero dollars and zero cents, I pretty much use what I already have to organize and beautify. Here's my craft area:


The brown shelf in the middle of the wall was my big splurge: a bathroom storage cabinet I found on sale for $14 at Target. The storage containers on either side are from my old classroom when I taught elementary school. They are backed with extra fabric from my daughter's curtains.The ribbon rolls underneath are on dowels that I painted white and hung with more ribbon. Seriously, you make do, right?

See the "table"? I took an old white cabinet door and stapled fabric to it and then glued on some brown ribbon. It's being propped up (underneath the blue fabric) with plastic storage bins filled with my craft supplies. It was a mess under there and it was hard to figure out what I have and what I need. It was hideous. Hideous!

But then I walked into Jo-Ann's and I saw this by the door:

And they were selling it! For ONLY $25!!! Cue Angels singing. And you see the drawer dividers? My craft supply storage problem could be solved with this sexy beast.

I wanted to wrap my body around it and hug it and love it and call it George.
I bought it immediately, muscled it (with some help from the old ladies at Jo-Ann's - thanks old ladies!) into my Blazer and drove home illegally with it hanging out the back of my car about a foot.

Then I spent the next week trying to figure out how to beautify it. And this is what I did!

Materials:
Filing Cabinet
Scrapbook paper (make sure to wait until it's on sale, because you'll need a lot!)
Mod Podge
Brayer
Craft Knife (like an X-Acto)
Sand Paper - fine grit (optional)
1/4" Ribbon
1" Ribbon
Tacky Glue

Measure and cut pieces of scrapbook paper to fit the front of the drawers. Mod Podge them on, using the brayer to smooth out any air bubbles. Don't worry about measuring the drawer handles, you are going to cut them open with your craft knife after the Mod Podge has dried. Cut little strips of paper for the edges and Mod Podge those on, too.


Cut out the handles with a craft knife. They don't need to be pretty because you'll be covering them with the ribbon later.


I'm kind of a freak and I wanted my paper to fit perfectly across the sides of my cabinet. I didn't want, say, 2 whole sheets of paper and then 4 inches of another sheet. So I measured my cabinet and figured out how much I needed to trim the pieces of paper to make sure they fit. You can still see the seams of the paper, but I chose a print that's continuous, so it still looks nice. Also, I overlapped the corners of the file cabinet with the paper a little to give them a nice rounded look.


Apply two or three more coats of Mod Podge and let dry. Wet-sand if you want to make it extra-smooth and beautiful.

Measure and cut pieces of scrapbook paper to fit inside your handles and Mod Podge them in.

Cut your ribbon to size and glue it on with the Tacky Glue. Hot Dang! You are done!

Oh, and those coordinating magazine holders? I TOTALLY DID NOT cut out those FREE flat-rate cardboard boxes that you can get at the post office. And then Modge Podge on pretty paper and then glue on matching brown ribbon. You know why I didn't? Because that would be illegal. So don't do it! I'm glad I didn't do it. Whew!

And look! I feel so organized! I'm not ashamed to admit that I spent two hours and two glasses of red wine happily organizing all my stuff. It was like a date night with myself. It just makes me happy!


Ahhh.... How I love organization!

Triple Park Friday

This morning James took this awesome picture of Peyton flying his Iron Man Kite. Peyton loves his kite so much that he doesn't even care if it's windy enough to fly, he'll bring it out anyway. Usually he just lets the string out about 10 feet and runs around the backyard with it trailing behind him. So the fact that we had a little breeze today was an extra-special bonus and Peyton was thrilled!


And since it was a nice day, Peyton and Ella and I decided to go find a new park. We have a bunch parks in our city, so I got out the map and let Peyton pick out a new one. Last summer, during our first year in Iowa, we played at a lot of parks, but we still haven't seen them all. Honestly there are certain streets you can drive down and see 3 parks within a 2 mile stretch. We have A LOT of parks. It's really neat and I feel very lucky.

So here we are at Park 1:

Peyton on some sort of tree thing that I couldn't figure out. Are you supposed to climb up? Down? Who knows?


Ella showing off her new rock-climbing skills (never mind the angle of the ground, I don't want to ruin her self esteem):


This park had a zip line! Peyton hasn't been on one since we were in California and he was really excited! He went on it about 50 times. Ella went on it once and was done with the nonsense of it all.


We had been at Park 1 for about 45 minutes when I suggested we go find another new park. The kids were all for it so we hopped in the car and went exploring.

Here we are at Park 2:

This was a giant fish, so I guess those are fish bones for the kids to climb up. It's really steep, so of course Peyton and Ella loved the challenge. But I liked it because there was nowhere for them to go if they slipped because I could stand right behind them.


And an alligator/crocodile type of thing to climb or go down. I still don't know what's going on. I wouldn't care, but I don't want to be THAT parent. You know, the one who lets her kids break all the park rules when there are little kids around. THAT parent drives me nuts. I'm also not a fan of the parent who let her 5 kids (ages of about 2 to 8) run around the park while she sat in her air-conditioned car in the PARKING LOT! What the heck!?! If you are one of THOSE parents, I'm totally judging you. Follow the rules! Watch your kids! Do it! DANG! Whatever, I'm moving on.
Look how cute!


Okay, this has got to be one of the coolest things about the parks here. There are trees and nature and sticks and stuff. We looked over and saw a little path at the edge of the park so we went to investigate. We found a little creek and heard some beautiful birds and it was like we walked into another world:


And look how close it was to the park! Can you see the play set off to the left behind Peyton? So freakin' cool!


We were getting a little hot so we decided to go home and jump around in the sprinkler to cool off. And by a little hot, I mean about 75 degrees, but Peyton was "SO HOT MOMMY! I'm getting hotter just watching you drive! Can you turn on the heater?" Obviously, we're still trying to teach him the difference between the air conditioner and heater. But when you have winters like we do, and you are 5, it's easy to think that the Happy Button is always going to be the heater.
As we got closer to home, we changed our minds and decided to hit one more park. This one is in our little stomping grounds and we've been here a bunch of times. The path to the park is an obstacle course made up of picnic tables:


And interestingly, neither of the other two parks we played at today had swings. And swinging is Ella's favorite thing ever:


Now there can be peace in our family. Ella got to swing.


And then we went home and played in the sprinklers and had nachos for dinner and made Rice Crispy Treats for dessert and it was a beautiful day.


4th of July Window Stars Kid Kit


Just in time for Independence Day! This 4th of July Window Stars Kid Kit is fun to make and so patriotic! And since the kit actually makes 3 stars, you can make it with up to 3 kids! Of course, if your kids are like mine they'll be fighting over the red star. Because "That's the best color!" Silly Mommy.


It's a simple craft of cutting and gluing, but the results are stunning! My kids really enjoyed mixing the glue with a little water and "painting" it on the wax paper. I guess glue is extra special if it's mixed with water! And they loved sprinkling the little confetti stars on top.


I think the completed Window Stars look best when they are hung in a nice little Red, White, and Blue row. My kids think they look best hung willy-nilly all over the house. You know, like the 4th of July threw up it's favorite colors in here. Oh well...